2022年1月
CloudatCost
2 vCPU Core
IPv4/6 public IP
2 GB RAM
20 GB NVMe
現在、OS テンプレートに CentOS Stream 8 がないので、
CentOS Linux 8 → CentOS Stream 8 変換をしています。
自分用サーバ構築メモです。
「Advanced Server Information」に書かれている「IP Address」と「Password」で root によるパスワード接続をします。
僕の場合、接続元 PC の OS は、Linux(Fedora)です。↓(参考:WAVE Log : Linux Desktop)
[fedora@local ~]$ ssh root@xxx.xxx.xxx.xxx
root によるパスワード入力不要の鍵方式ログインに変更します。
ちなみに、秘密鍵自体にはパスワードをかけています。作成した authorized_keys に公開鍵をコピペします。
~]# mkdir ~/.ssh
~]# chmod 700 ~/.ssh
~]# vi ~/.ssh/authorized_keys
~]# chmod 600 ~/.ssh/authorized_keys
設定ファイル編集。
~]# vi /etc/ssh/sshd_config
以下のようにする。
SyslogFacility AUTHPRIV
PermitRootLogin without-password
PermitEmptyPasswords no
PasswordAuthentication no
sshd 再起動。
~]# systemctl restart sshd
~]# setenforce 0
SELinux 設定ファイル編集。
SELINUX=disabled にする。
~]# vi /etc/sysconfig/selinux
~]# timedatectl set-timezone Asia/Tokyo
「ja_JP.utf8」のロケールが有るか、確認。
~]# locale -a | grep -i ja
locale: Cannot set LC_CTYPE to default locale: No such file or directory
locale: Cannot set LC_MESSAGES to default locale: No such file or directory
locale: Cannot set LC_COLLATE to default locale: No such file or directory
無いので、インストール。
~]# dnf install glibc-langpack-ja
文字コードを設定。
~]# localectl set-locale LANG=ja_JP.utf8
~]# localectl set-keymap jp106
ホスト名設定。
~]# hostnamectl set-hostname cac.example.tk
以下を見ておく。
~]# cat /etc/hostname
~]# cat /etc/hosts
~]# cat /etc/resolv.conf
~]# nmcli d
DEVICE TYPE STATE CONNECTION
ens160 ethernet 接続済み System ens160
lo loopback 管理無し --
~]# nmcli d show ens160
~]# cat /etc/sysconfig/network-scripts/ifcfg-ens160
IPv6 の設定をする。
~]# nmcli c mod "System ens160" ipv6.method "auto"
~]# nmcli c mod "System ens160" ipv6.addresses "2001:db8::a123:162b/120"
~]# nmcli c mod "System ens160" ipv6.gateway "2001:db8::a123:1601"
~]# nmcli c mod "System ens160" ipv6.dns "2606:4700:4700::1111 2606:4700:4700::1001"
~]# nmcli c mod "System ens160" ipv6.method "manual"
~]# systemctl restart NetworkManager
参考:公開 DNS サービス
1.1.1.1 — the Internet’s Fastest, Privacy-First DNS Resolver
Google Public DNS IP addresses
※なぜか、サーバを再起動しないと、nmcli d show ens160 の IP6.ADDRESS が反映されなかった。
~]# reboot
~]# systemctl enable --now firewalld.service
アクティブゾーンを確認する。
~]# firewall-cmd --get-active-zones
public
interfaces: ens160
アクティブゾーンの恒久的なファイアウォール設定を確認。
~]# firewall-cmd --list-all --zone=public --permanent
public
target: default
icmp-block-inversion: no
interfaces:
sources:
services: cockpit dhcpv6-client ssh
ports:
protocols:
masquerade: no
forward-ports:
source-ports:
icmp-blocks:
rich rules:
~]# dnf swap centos-linux-repos centos-stream-repos
~]# dnf distro-sync
EPEL のリポジトリをインストール
~]# dnf -y install epel-release
EPEL 設定ファイルの「enabled=1」を「enabled=0」に変更。
~]# vi /etc/yum.repos.d/epel.repo
dnf アップデート
~]# dnf -y update
ベース,開発ツールパッケージ群インストール。
~]# dnf -y group install base "Development tools"
dnf-automatic インストール。
~]# dnf -y install dnf-automatic
dnf-automatic-install 自動起動有効+起動。
~]# systemctl enable --now dnf-automatic-install.timer
nkf コマンドインストール。
~]# dnf --enablerepo=powertools install nkf
jq コマンドインストール。
~]# dnf install jq
CloudatCost では、仮想化ソフトの VMware が利用されています。どうやら、VMware はカーネルを最新にアップデートすると調子が悪くなるようなので、起動するカーネルをやや古いものにしています。
・デフォルトのカーネルを変更・指定する。
デフォルトで起動するカーネルを調べる。
~]# grubby --default-kernel
~]# grubby --default-index
カーネルリストを表示する。
~]# grubby --info=ALL | grep -A 2 index
デフォルトカーネルを変更する。(index=1 は例)
~]# grubby --set-default-index=1
変更されているかを確認する。
~]# grubby --default-kernel
・カーネルのバージョンが上がらないようにする。追加。
~]# vi /etc/sysconfig/kernel
#UPDATEDEFAULT=yes
UPDATEDEFAULT=no
~]# vi /etc/chrony.conf
追加。
# Use public servers from the pool.ntp.org project.
# Please consider joining the pool (http://www.pool.ntp.org/join.html).
#pool 2.centos.pool.ntp.org iburst
pool ntp.nict.jp iburst
再起動。
~]# systemctl enable --now chronyd
時刻同期状態確認。
~]# chronyc sources
~]# dnf --enablerepo=epel -y install clamav clamav-update clamav-scanner-systemd
Clam AntiVirus 設定ファイルを編集します。
~]# vi /etc/clamd.d/scan.conf
変更と削除
#Example
#LogFile /var/log/clamd.scan
#LogFileMaxSize 2M
#LogTime yes
#LogRotate yes
#LocalSocket /run/clamd.scan/clamd.sock
#FixStaleSocket yes
#ExcludePath ^/proc/
#ExcludePath ^/sys/
User clamscan
↓↓↓
User root
ウイルス定義ファイル更新を設定します。
~]# vi /etc/freshclam.conf
変更と削除
#Example
#UpdateLogFile /var/log/freshclam.log
#LogFileMaxSize 2M
#LogTime yes
#LogRotate yes
#DatabaseOwner clamupdate
↓↓↓
DatabaseOwner root
clamd デーモンを起動させないので、下記の設定をすると freshclam 時、エラーが出ます。
^Clamd was NOT notified: Can't connect to clamd through /run/clamd.scan/clamd.sock: No such file or directory
#NotifyClamd /path/to/clamd.conf
↓↓↓
NotifyClamd /etc/clamd.d/scan.conf
ウイルス定義ファイルを最新に更新します。
~]# freshclam
Clam AntiVirus はメモリを多量に消費する(メモリ 2 GB でも重くなる)ので、全ファイルのウイルススキャンを行うときだけ freshclam を実行後 start して終了したら stop させています。
全ファイルのウイルススキャンは、毎日定期的に行ない、ウイルスを検知した場合のみ root 宛にメールが送られてくるようにスクリプトを作成。
ウイルススキャン日次実行スクリプト作成
~]# vi /etc/cron.daily/clamdscan
#!/bin/bash
freshclam
systemctl start clamd@scan
# 設定ファイル
CONFIG=/etc/clamd.d/scan.conf
# スキャン実行
# ※ウイルス検知時は隔離ディレクトリへ隔離
CLAMSCANLOG=`mktemp`
QUARANTINEDIR=/tmp/clamdscan-quarantinedir-$(date +%Y%m%d)
mkdir -p ${QUARANTINEDIR}
clamdscan -c ${CONFIG} --move=${QUARANTINEDIR} / > ${CLAMSCANLOG} 2>&1
# ウイルス検知時のみroot宛にメール通知
if [ -z "$(grep FOUND$ ${CLAMSCANLOG})" ]; then
rm -rf ${QUARANTINEDIR}
else
grep -A 1 FOUND$ ${CLAMSCANLOG} | mail -s "Virus Found in `hostname` => ${QUARANTINEDIR}" root
fi
# スキャンログをシスログに出力
cat ${CLAMSCANLOG} | logger -t $(basename ${0})
rm -f ${CLAMSCANLOG}
systemctl stop clamd@scan
ウイルススキャン日次実行スクリプトへ実行権限付加。
~]# chmod +x /etc/cron.daily/clamdscan
ウイルス隔離ディレクトリをスキャン対象外にする。
~]# echo ExcludePath ^/tmp/clamdscan-quarantinedir-.*/ >> /etc/clamd.d/scan.conf
ウイルス検知後の対応
ウイルス検知メールが送られてきた場合、内容を確認し、ウイルスであると確認できた場合、当該ファイルを隔離先(ウイルス検知メール件名に記載)から削除する。
ウイルスでない(ClamAV による誤検知)と確認できた場合、当該ファイルを隔離先から復元し、次回以降、誤検知しないように当該ファイルをスキャン対象外にする。
WARNING: Your ClamAV installation is OUTDATED! と言われたら、下記アップデートをする。
但し、直ぐに対応されずに、アップデート出来るまでに数日~数週間かかることがあります。
~]# dnf --enablerepo=epel update clamav
postfix と mailx をインストール。
~]# dnf -y install postfix mailx
postfix 自動起動有効+起動。
~]# systemctl enable --now postfix
普段使っているメールアドレスに転送設定をする。(追加)
~]# vi /etc/aliases
・・・
・・・
# Person who should get root's mail
#root: marc
root: fudantukatteiru@example.net
設定反映。
~]# newaliases
テストメールを送る。
~]# echo test|mail root
~]# dnf install logwatch
perl-CPAN をインストール。
~]# dnf install perl-CPAN
入力。
~]# perl -MCPAN -e shell
CPAN.pm requires configuration, but most of it can be done automatically.
If you answer 'no' below, you will enter an interactive dialog for each
configuration option instead.
Would you like to configure as much as possible automatically? [yes] yes
Perl site library directory "/usr/local/share/perl5" does not exist.
Perl site library directory "/usr/local/share/perl5" created.
Perl site library directory "/usr/local/lib64/perl5" does not exist.
Perl site library directory "/usr/local/lib64/perl5" created.
Autoconfiguration complete.
commit: wrote '/root/.cpan/CPAN/MyConfig.pm'
You can re-run configuration any time with 'o conf init' in the CPAN shell
Terminal does not support AddHistory.
cpan shell -- CPAN exploration and modules installation (v2.18)
Enter 'h' for help.
cpan[1]> install MIME::Base64
cpan[2]> install CGI
cpan[3]> install Jcode
cpan[4]> quit
DNS サーバ構築…できない。(>_<)
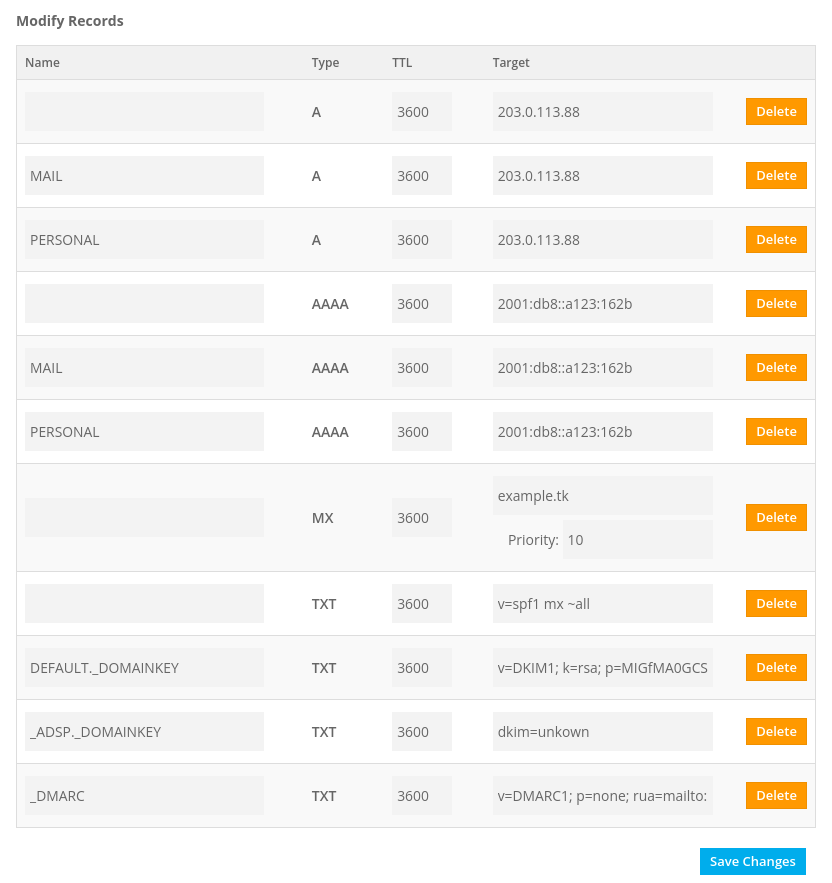
CloudatCost は、53番ポートをブロックするようになったようです。
なので、レジストラのネームサーバを利用します。なお、逆引きはコントロールパネルで行っています。
無料ドメインで有名な Freenom の例です。
(のちに導入する、SPF, DKIM, DMARC の設定もされています。)
Apache と PHP 及び PHP 関連パッケージをインストール。
~]# dnf -y install httpd php php-mbstring php-gd php-json php-xml
Apache 設定ファイル編集。
~]# vi /etc/httpd/conf/httpd.conf
変更と追加と削除。
ServerAdmin root@localhost
↓↓↓
ServerAdmin webmaster@example.tk
・・・
・・・
#ServerName www.example.com:80
↓↓↓
ServerName example.tk:80
・・・
・・・
<Directory "/var/www/html">
#
# Possible values for the Options directive are "None", "All",
# or any combination of:
# Indexes Includes FollowSymLinks SymLinksifOwnerMatch ExecCGI MultiViews
#
# Note that "MultiViews" must be named *explicitly* --- "Options All"
# doesn't give it to you.
#
# The Options directive is both complicated and important. Please see
# http://httpd.apache.org/docs/2.4/mod/core.html#options
# for more information.
#
Options Indexes FollowSymLinks
↓↓↓
Options Includes ExecCGI FollowSymLinks
#
# AllowOverride controls what directives may be placed in .htaccess files.
# It can be "All", "None", or any combination of the keywords:
# Options FileInfo AuthConfig Limit
#
AllowOverride None
↓↓↓
AllowOverride All
#
# Controls who can get stuff from this server.
#
Require all granted
</Directory>
・・・
・・・
<IfModule log_config_module>
#
# The following directives define some format nicknames for use with
# a CustomLog directive (see below).
#
LogFormat "%h %l %u %t \"%r\" %>s %b \"%{Referer}i\" \"%{User-Agent}i\"" combined
↓↓↓
LogFormat "%h %l %u %t \"%!414r\" %>s %b \"%{Referer}i\" \"%{User-Agent}i\"" combined
・・・
・・・
#
# If you prefer a logfile with access, agent, and referer information
# (Combined Logfile Format) you can use the following directive.
#
SetEnvIf Request_URI "default\.ida" no_log
SetEnvIf Request_URI "cmd\.exe" no_log
SetEnvIf Request_URI "root\.exe" no_log
SetEnvIf Request_URI "Admin\.dll" no_log
SetEnvIf Request_URI "NULL\.IDA" no_log
SetEnvIf Remote_Addr 127.0.0.1 no_log
CustomLog "logs/access_log" combined env=!no_log
</IfModule>
・・・
・・・
#AddHandler cgi-script .cgi .pl
以下を最終行へ追加。
ServerTokens Prod
TraceEnable off
autoindex 設定ファイル編集。
~]# vi /etc/httpd/conf.d/autoindex.conf
削除。
<Directory "/usr/share/httpd/icons">
Options Indexes MultiViews FollowSymlinks
AllowOverride None
Require all granted
</Directory>
テストページ削除。
~]# rm -f /etc/httpd/conf.d/welcome.conf
Perl コマンドへ /usr/local/bin/perl でもアクセスできるようにする。
~]# ln -s /usr/bin/perl /usr/local/bin/perl
Perl のパスを確認。
~]# whereis perl
Apache 自動起動有効+起動。
~]# systemctl enable --now httpd
ポート開放。
~]# firewall-cmd --add-service=http --zone=public --permanent
~]# firewall-cmd --reload
Web コンテンツ編集ユーザ(例:himari)を作成。
~]# useradd himari
~]# passwd himari
ドキュメントルート所有者を変更する。
~]# chown himari: /var/www/html/
himari で SSH 鍵方式ログイン出来るようにする。
himari にスイッチする。
~]# su - himari
[himari@server ~]$ mkdir ~/.ssh
[himari@server ~]$ chmod 700 ~/.ssh
公開鍵の中身を authorized_keys にコピペして保存。
[himari@server ~]$ vi ~/.ssh/authorized_keys
[himari@server ~]$ chmod 600 ~/.ssh/authorized_keys
~]# vi /etc/php.ini
変更と削除と追加。
short_open_tag = Off
↓↓↓
short_open_tag = On
output_buffering = 4096
↓↓↓
output_buffering = Off
display_errors = Off
↓↓↓
display_errors = On
;date.timezone = Asia/Tokyo
;mbstring.language = Japanese
;mbstring.internal_encoding = UTF-8
;mbstring.http_input = UTF-8
;mbstring.http_output = UTF-8
;mbstring.encoding_translation = Off
↓↓↓
mbstring.encoding_translation = On
;mbstring.detect_order = auto
;mbstring.substitute_character = none
↓↓↓
mbstring.substitute_character = "?"
httpd リロード。
~]# systemctl reload httpd
新サーバで改めて証明書を取得するのではなく、旧サーバから新サーバに移転しました。
旧サーバで /etc/letsencrypt ディレクトリ以下を zip 圧縮して、移転先の新サーバで解凍します。
とりあえず、新サーバに Certbot クライアントをインストールします。参考:Certbot - Centosrhel8 Apache
まず、snapd をインストールし、自動起動有効+起動。
~]# dnf --enablerepo=epel install snapd
~]# systemctl enable --now snapd.socket
シンボリックリンクを作成。
~]# ln -s /var/lib/snapd/snap /snap
Core をインストール。
~]# snap install core
アップデート。
~]# snap refresh core
certbot をインストール。
~]# snap install --classic certbot
シンボリックリンクを作成。
~]# ln -s /snap/bin/certbot /usr/bin/certbot
旧サーバで /etc/letsencrypt ディレクトリ以下を zip 圧縮する。
[root@old_server ~]# cd /etc/
[root@old_server etc]# zip -ry letsencrypt.zip letsencrypt
新サーバの /etc で letsencrypt.zip を解凍する。
~]# cd /etc/
etc]# unzip letsencrypt.zip
etc]# rm letsencrypt.zip
mod_ssl インストール。
~]# dnf -y install mod_ssl
SSL 設定ファイル編集。
~]# vi /etc/httpd/conf.d/ssl.conf
変更と追加。
# Use separate log files for the SSL virtual host; note that LogLevel
# is not inherited from httpd.conf.
ErrorLog logs/ssl_error_log
↓↓↓
ErrorLog logs/error_log
TransferLog logs/ssl_access_log
↓↓↓
CustomLog logs/access_log combined env=!no_log
LogLevel warn
・・・
・・・
#SSLProtocol all -SSLv3
#SSLProxyProtocol all -SSLv3
SSLProtocol -all +TLSv1.2 +TLSv1.3
SSLProxyProtocol -all +TLSv1.2 +TLSv1.3
・・・
・・・
SSLCertificateFile /etc/pki/tls/certs/localhost.crt
↓↓↓
SSLCertificateFile /etc/letsencrypt/live/example.tk/cert.pem
・・・
・・・
SSLCertificateKeyFile /etc/pki/tls/private/localhost.key
↓↓↓
SSLCertificateKeyFile /etc/letsencrypt/live/example.tk/privkey.pem
・・・
・・・
#SSLCertificateChainFile /etc/pki/tls/certs/server-chain.crt
↓↓↓
SSLCertificateChainFile /etc/letsencrypt/live/example.tk/chain.pem
・・・
・・・
Header always set Strict-Transport-Security "max-age=15768000"
</VirtualHost>
Apache 設定反映。
~]# systemctl reload httpd
ポート開放。
~]# firewall-cmd --add-service=https --zone=public --permanent
~]# firewall-cmd --reload
バーチャルホスト設定ファイル作成
~]# vi /etc/httpd/conf.d/virtualhost-example.tk.conf
メールサーバ名(例:mail.example.tk)で Web サーバ(例:example.tk)へアクセスできるようにする。
<VirtualHost *:80>
ServerName example.tk
ServerAlias mail.example.tk
DocumentRoot /var/www/html
</VirtualHost>
Apache 設定反映。
~]# systemctl reload httpd
サーバ証明書取得。
~]# certbot certonly --webroot -w /var/www/html/ -m any@example.tk -d mail.example.tk --agree-tos
Postfix 設定ファイル編集。
~]# vi /etc/postfix/main.cf
変更と削除と追加。
#myhostname = host.domain.tld
#myhostname = virtual.domain.tld
myhostname = mail.example.tk
・・・
・・・
#mydomain = domain.tld
mydomain = example.tk
・・・
・・・
#myorigin = $myhostname
#myorigin = $mydomain
myorigin = $mydomain
・・・
・・・
#inet_interfaces = all
#inet_interfaces = $myhostname
#inet_interfaces = $myhostname, localhost
inet_interfaces = localhost
↓↓↓
inet_interfaces = all
・・・
・・・
mydestination = $myhostname, localhost.$mydomain, localhost
↓↓↓
mydestination = $myhostname, localhost.$mydomain, localhost, $mydomain
#mydestination = $myhostname, localhost.$mydomain, localhost, $mydomain
#mydestination = $myhostname, localhost.$mydomain, localhost, $mydomain,
# mail.$mydomain, www.$mydomain, ftp.$mydomain
・・・
・・・
#home_mailbox = Mailbox
#home_mailbox = Maildir/
home_mailbox = Maildir/
・・・
・・・
#smtpd_banner = $myhostname ESMTP $mail_name
#smtpd_banner = $myhostname ESMTP $mail_name ($mail_version)
smtpd_banner = $myhostname ESMTP unknown
・・・
・・・
#smtpd_tls_cert_file = /etc/pki/tls/certs/postfix.pem
・・・
・・・
#smtpd_tls_key_file = /etc/pki/tls/private/postfix.key
以下を最終行へ追加。
smtpd_sasl_auth_enable = yes
smtpd_recipient_restrictions =
permit_mynetworks
permit_sasl_authenticated
reject_unauth_destination
message_size_limit = 10485760
smtpd_tls_security_level = may
smtp_tls_mandatory_protocols = !SSLv2, !SSLv3
smtpd_tls_mandatory_protocols = !SSLv2, !SSLv3
smtpd_tls_cert_file = /etc/letsencrypt/live/mail.example.tk/fullchain.pem
smtpd_tls_key_file = /etc/letsencrypt/live/mail.example.tk/privkey.pem
smtpd_tls_session_cache_database = btree:/var/lib/postfix/smtpd_scache
master.cf 編集。
~]# vi /etc/postfix/master.cf
削除。
#submission inet n - n - - smtpd
# -o syslog_name=postfix/submission
# -o smtpd_tls_security_level=encrypt
# -o smtpd_sasl_auth_enable=yes
・・・
・・・
#smtps inet n - n - - smtpd
# -o syslog_name=postfix/smtps
# -o smtpd_tls_wrappermode=yes
# -o smtpd_sasl_auth_enable=yes
cyrus-sasl インストール。
~]# dnf -y install cyrus-sasl
自動起動有効+起動。
~]# systemctl enable --now saslauthd
新規ユーザ追加時に自動でホームディレクトリに Maildir 形式のメールボックスが作成されるようにする。(「Spam」「Drafts」「Sent」「Trash」も作成)
~]# mkdir -p /etc/skel/Maildir/{new,cur,tmp}
~]# chmod -R 700 /etc/skel/Maildir/
~]# mkdir -p /etc/skel/Maildir/.Spam/{new,cur,tmp}
~]# chmod -R 700 /etc/skel/Maildir/.Spam
~]# mkdir -p /etc/skel/Maildir/.Drafts/{new,cur,tmp}
~]# chmod -R 700 /etc/skel/Maildir/.Drafts
~]# mkdir -p /etc/skel/Maildir/.Sent/{new,cur,tmp}
~]# chmod -R 700 /etc/skel/Maildir/.Sent
~]# mkdir -p /etc/skel/Maildir/.Trash/{new,cur,tmp}
~]# chmod -R 700 /etc/skel/Maildir/.Trash
存在しないユーザ宛メールの破棄。
~]# vi /etc/postfix/main.cf
以下を最終行へ追加。
local_recipient_maps =
luser_relay = unknown_user@localhost
unknown_user 宛メールを破棄。
~]# echo unknown_user: /dev/null >> /etc/aliases
/etc/aliases 変更反映。
~]# newaliases
Postfix 再起動。
~]# systemctl restart postfix
ポート開放。
~]# firewall-cmd --add-port=25/tcp --zone=public --permanent
~]# firewall-cmd --add-port=587/tcp --zone=public --permanent
~]# firewall-cmd --reload
Dovecot インストール。
~]# dnf -y install dovecot
10-mail.conf 編集。
~]# vi /etc/dovecot/conf.d/10-mail.conf
追加。
#mail_location =
mail_location = maildir:~/Maildir
10-auth.conf 編集。
~]# vi /etc/dovecot/conf.d/10-auth.conf
追加。
#disable_plaintext_auth = yes
disable_plaintext_auth = no
10-ssl.conf 編集。
~]# vi /etc/dovecot/conf.d/10-ssl.conf
変更。
ssl_cert = </etc/pki/dovecot/certs/dovecot.pem
↓↓↓
ssl_cert = </etc/letsencrypt/live/mail.example.tk/fullchain.pem
ssl_key = </etc/pki/dovecot/private/dovecot.pem
↓↓↓
ssl_key = </etc/letsencrypt/live/mail.example.tk/privkey.pem
Dovecot 自動起動有効+起動。
~]# systemctl enable --now dovecot
ポート開放。
~]# firewall-cmd --add-port=993/tcp --zone=public --permanent
~]# firewall-cmd --reload
SSH によるリモート接続はできないメールユーザ(例:rin)を作成。
~]# useradd -s /sbin/nologin rin
~]# passwd rin
SpamAssassin + spamass-milter インストール。
~]# dnf --enablerepo=epel install spamass-milter-postfix
~]# systemctl enable --now spamassassin
SpamAssassin 設定。
~]# vi /etc/mail/spamassassin/v310.pre
削除。
# TextCat - language guesser
#
#loadplugin Mail::SpamAssassin::Plugin::TextCat
SpamAssassin 設定ファイル日次最新化スクリプト作成。
~]# vi /etc/cron.daily/spamassassin-update
#!/bin/bash
# SpamAssassin 設定ファイル最新版ダウンロード
cd /etc/mail/spamassassin
wget -q https://github.com/kittyfreak/spamassassin_user_prefs/archive/refs/heads/main.zip
[ $? -ne 0 ] && exit
unzip main.zip >/dev/null 2>&1
[ $? -ne 0 ] && exit
rm -f main.zip
mv spamassassin_user_prefs-main/user_prefs .
rm -rf spamassassin_user_prefs-main
# 設定ファイル更新時のみ SpamAssassin 再起動
diff user_prefs user_prefs.org > /dev/null 2>&1
if [ $? -ne 0 ]; then
cp user_prefs local.cf
# required_score 値変更
sed -i 's/^required_score.*/required_score 5.0/g' local.cf
# スパム判断したメールを添付形式にしないように設定
echo "report_safe 0" >> local.cf
# SpamAssassin再起動
systemctl restart spamassassin > /dev/null
fi
cp user_prefs user_prefs.org
~]# chmod +x /etc/cron.daily/spamassassin-update
~]# /etc/cron.daily/spamassassin-update
SpamAssassin ルール自動更新。
sa-update.timer は起動していたが、自動起動が無効だったので有効にする。
~]# systemctl enable sa-update.timer
spamass-milter 起動。
~]# systemctl enable --now spamass-milter
milter-manager インストール。
~]# curl -s https://packagecloud.io/install/repositories/milter-manager/repos/script.rpm.sh | bash
~]# dnf -y install milter-manager
~]# systemctl enable --now milter-manager
Postfix + milter-manager 連携設定。
~]# vi /etc/postfix/main.cf
追加。
milter_protocol = 6
milter_mail_macros = {auth_author} {auth_type} {auth_authen}
smtpd_milters = unix:/var/run/milter-manager/milter-manager.sock
~]# usermod -G milter-manager -a postfix
~]# systemctl reload postfix
milter-manager + spamass-milter 連携設定。
~]# usermod -G postfix -a milter-manager
~]# systemctl restart milter-manager
Procmail 設定ファイル作成。
~]# vi /etc/procmailrc
SHELL=/bin/bash
PATH=/usr/bin:/bin
DROPPRIVS=yes
MAILDIR=$HOME/Maildir
DEFAULT=$MAILDIR/
LOGFILE=$HOME/.procmail.log # ログ出力先
VERBOSE=ON # 詳細ログ出力
# SpamAssassinにより判定されたSpam-Levelが一定値(ここでは20)以上の場合は削除
# ※必要なメールが削除されてしまう可能性があることに留意すること
:0
* ^X-Spam-Level: \*\*\*\*\*\*\*\*\*\*\*\*\*\*\*\*\*\*\*\*
/dev/null
~]# vi /etc/logrotate.d/procmail
/home/*/.procmail.log {
missingok
nocreate
notifempty
}
Postfix + Procmail 連携設定。
~]# vi /etc/postfix/main.cf
追加。
# The mailbox_command parameter specifies the optional external
# command to use instead of mailbox delivery. The command is run as
# the recipient with proper HOME, SHELL and LOGNAME environment settings.
# Exception: delivery for root is done as $default_user.
#
# Other environment variables of interest: USER (recipient username),
# EXTENSION (address extension), DOMAIN (domain part of address),
# and LOCAL (the address localpart).
#
# Unlike other Postfix configuration parameters, the mailbox_command
# parameter is not subjected to $parameter substitutions. This is to
# make it easier to specify shell syntax (see example below).
#
# Avoid shell meta characters because they will force Postfix to run
# an expensive shell process. Procmail alone is expensive enough.
#
# IF YOU USE THIS TO DELIVER MAIL SYSTEM-WIDE, YOU MUST SET UP AN
# ALIAS THAT FORWARDS MAIL FOR ROOT TO A REAL USER.
#
#mailbox_command = /some/where/procmail
#mailbox_command = /some/where/procmail -a "$EXTENSION"
mailbox_command = /usr/bin/procmail
~]# systemctl reload postfix
スパムメール振分け設定(受信メールサーバが IMAP の場合のみ)
SpamAssassin がスパム判定したメールはスパム専用メールボックスへ配送するようにする。
~]# vi /etc/procmailrc
以下を最後尾へ追加。
# SpamAssassinがスパム判定したメールはスパム専用メールボックス(/home/xxxx/Maildir/.Spam)へ配送
:0
*^X-Spam-Flag: YES
$HOME/Maildir/.Spam/
スパムメール学習(受信メールサーバがIMAPの場合のみ)
~]# dnf -y install tmpwatch
~]# vi /etc/cron.daily/spamassassin-learn
#!/bin/bash
PATH=/usr/sbin:/usr/bin:/bin
for user in `ls /home/`
do
# 正常メール学習
# 正常メールをSpamAssassinに学習させる
hammail=/home/$user/Maildir/cur
[ -d "$hammail" ] && \
su $user -s "/bin/bash" -c "sa-learn --ham $hammail | \
logger -p mail.info -t 'sa-learn for $user'"
hammail=/home/$user/Maildir/.Trash/cur
[ -d "$hammail" ] && \
su $user -s "/bin/bash" -c "sa-learn --ham $hammail | \
logger -p mail.info -t 'sa-learn for $user'"
# スパムメール
spammail=/home/$user/Maildir/.Spam/cur
# スパムメール学習
if [ -d "$spammail" ]; then
# スパムメールをSpamAssassinに学習させる
su $user -s "/bin/bash" -c "sa-learn --spam $spammail | \
logger -p mail.info -t 'sa-learn for $user'"
# 受信後一ヶ月経過したスパムメールを削除
tmpwatch -m 720 $spammail
fi
done
~]# chmod +x /etc/cron.daily/spamassassin-learn
※スパムメール学習結果のログは /var/log/maillog に記録される。
OpenDKIM インストール。
~]# dnf --enablerepo=epel install opendkim
/etc/opendkim/keys/ にキーペア(秘密鍵/公開鍵)の情報ファイルを作成。
~]# opendkim-genkey -D /etc/opendkim/keys/ -d example.tk
ファイルの所有権を設定。
~]# chown opendkim: /etc/opendkim/keys/*
確認。
~]# ls -l /etc/opendkim/keys/
合計 8
-rw------- 1 opendkim opendkim 887 4月 2 20:03 default.private
-rw------- 1 opendkim opendkim 315 4月 2 20:03 default.txt
公開鍵情報ファイルの内容を確認。
~]# cat /etc/opendkim/keys/default.txt
default._domainkey IN TXT ( "v=DKIM1; k=rsa; "
"p=公開鍵データ" ) ; ----- DKIM key default for example.tk
レジストラのネームサーバに DKIM で利用する2つのレコード(公開鍵レコードと ADSP レコード)及び DMARC レコードを登録。
default._domainkey IN TXT ( "v=DKIM1; k=rsa; "
"p=公開鍵データ" ) ; ----- DKIM key default for example.tk
_adsp._domainkey.example.tk. IN TXT "dkim=unkown"
_dmarc.example.tk. IN TXT "v=DMARC1; p=none; rua=mailto:dmarc-rua@example.tk"
opendkim.conf の設定。
~]# vi /etc/opendkim.conf
変更と削除。
・・・
・・・
## Selects operating modes. Valid modes are s (sign) and v (verify). Default is v.
## Must be changed to s (sign only) or sv (sign and verify) in order to sign outgoing
## messages.
Mode v
↓↓↓
Mode sv
・・・
・・・
## Add a DKIM-Filter header field to messages passing through this filter
## to identify messages it has processed.
SoftwareHeader yes
↓↓↓
SoftwareHeader no
・・・
・・・
## Domain(s) whose mail should be signed by this filter. Mail from other domains will
## be verified rather than being signed. Uncomment and use your domain name.
## This parameter is not required if a SigningTable is in use.
# Domain example.com
↓↓↓
Domain example.tk
・・・
・・・
## Identifies a set of "external" hosts that may send mail through the server as one
## of the signing domains without credentials as such.
# ExternalIgnoreList refile:/etc/opendkim/TrustedHosts
## Identifies a set "internal" hosts whose mail should be signed rather than verified.
# InternalHosts refile:/etc/opendkim/TrustedHosts
・・・
・・・
TrustedHosts ファイル確認。
~]# cat /etc/opendkim/TrustedHosts
# OPENDKIM TRUSTED HOSTS
# To use this file, uncomment the #ExternalIgnoreList and/or the #InternalHosts
# option in /etc/opendkim.conf then restart OpenDKIM. Additional hosts
# may be added on separate lines (IP addresses, hostnames, or CIDR ranges).
# The localhost IP (127.0.0.1) should always be the first entry in this file.
127.0.0.1
::1
#host.example.com
#192.168.1.0/24
OpenDKIM の起動と自動起動設定。
~]# systemctl enable --now opendkim
SMTP接続時にDKIMと連携するパラメータ設定を追記。
~]# vi /etc/postfix/main.cf
最終行へ追加。
# DKIM連携の設定
smtpd_milters = inet:127.0.0.1:8891
non_smtpd_milters = inet:127.0.0.1:8891
milter_default_action = accept
設定ファイルにエラーが無いか確認。
~]# postfix check
postfix: warning: /etc/postfix/main.cf, line 771: overriding earlier entry: smtpd_milters=unix:/var/run/milter-manager/milter-manager.sock
smtpd_milters を一行で記述する。
~]# vi /etc/postfix/main.cf
削除と変更。
smtpd_milters = unix:/var/run/milter-manager/milter-manager.sock
・・・
・・・
smtpd_milters = inet:127.0.0.1:8891
↓↓↓
smtpd_milters = inet:127.0.0.1:8891, unix:/var/run/milter-manager/milter-manager.sock
Postfix の設定再読み込み。
~]# systemctl reload postfix
Certbot パッケージには、有効期限が切れる前に証明書を自動的に更新する systemd タイマーが付属しています。
一日2回、更新が試されます。
~]# systemctl list-timers
~]# cat /etc/systemd/system/snap.certbot.renew.timer
post_hook の設定は、/etc/letsencrypt/renewal/ にドメイン名の .conf ファイルがあるので、その [renewalparams] セクションに追記しています。
追加。
~]# vi /etc/letsencrypt/renewal/example.tk.conf
・・・
・・・
authenticator = webroot
webroot_path = /var/www/html,
post_hook = systemctl reload httpd
・・・
・・・
~]# vi /etc/letsencrypt/renewal/mail.example.tk.conf
・・・
・・・
authenticator = webroot
webroot_path = /var/www/html,
post_hook = systemctl restart postfix;systemctl restart dovecot
・・・
・・・
cron で古い証明書の削除だけ行なっています。
~]# vi /etc/cron.weekly/certbot
#!/bin/bash
find /etc/letsencrypt/archive/example.tk/ -mtime +90 -delete
find /etc/letsencrypt/archive/mail.example.tk/ -mtime +90 -delete
find /etc/letsencrypt/csr/ -mtime +90 -delete
find /etc/letsencrypt/keys/ -mtime +90 -delete
スクリプトへ実行権限付加。
~]# chmod +x /etc/cron.weekly/certbot
php-mysqlnd も一緒にインストールしています。
~]# dnf -y install mariadb-server php-mysqlnd
MariaDB 設定ファイル編集。
~]# vi /etc/my.cnf.d/mariadb-server.cnf
追加。
# This group is only read by MariaDB servers, not by MySQL.
# If you use the same .cnf file for MySQL and MariaDB,
# you can put MariaDB-only options here
[mariadb]
character-set-server = utf8mb4
[client-mariadb]
default-character-set = utf8mb4
自動起動有効+起動。
~]# systemctl enable --now mariadb
MariaDB 初期設定。
~]# mysql_secure_installation
入力,コメント。
NOTE: RUNNING ALL PARTS OF THIS SCRIPT IS RECOMMENDED FOR ALL MariaDB
SERVERS IN PRODUCTION USE! PLEASE READ EACH STEP CAREFULLY!
In order to log into MariaDB to secure it, we'll need the current
password for the root user. If you've just installed MariaDB, and
you haven't set the root password yet, the password will be blank,
so you should just press enter here.
Enter current password for root (enter for none): ⏎
OK, successfully used password, moving on...
Setting the root password ensures that nobody can log into the MariaDB
root user without the proper authorisation.
Set root password? [Y/n] ⏎
New password: 任意の root パスワードを応答
Re-enter new password: 上記と同じパスワードを応答(確認)
Password updated successfully!
Reloading privilege tables..
... Success!
By default, a MariaDB installation has an anonymous user, allowing anyone
to log into MariaDB without having to have a user account created for
them. This is intended only for testing, and to make the installation
go a bit smoother. You should remove them before moving into a
production environment.
Remove anonymous users? [Y/n] ⏎
... Success!
Normally, root should only be allowed to connect from 'localhost'. This
ensures that someone cannot guess at the root password from the network.
Disallow root login remotely? [Y/n] ⏎
... Success!
By default, MariaDB comes with a database named 'test' that anyone can
access. This is also intended only for testing, and should be removed
before moving into a production environment.
Remove test database and access to it? [Y/n] ⏎
- Dropping test database...
... Success!
- Removing privileges on test database...
... Success!
Reloading the privilege tables will ensure that all changes made so far
will take effect immediately.
Reload privilege tables now? [Y/n] ⏎
... Success!
Cleaning up...
All done! If you've completed all of the above steps, your MariaDB
installation should now be secure.
Thanks for using MariaDB!
【MariaDB 操作】
MariaDB へ root でログイン。
~]# mysql -u root -p
Enter password:
testDB データベースへの全てのアクセス権限を持った、新規ユーザ mei(パスワード:meipass )を登録。
MariaDB [(none)]> GRANT ALL PRIVILEGES ON testdb.* TO mei@localhost IDENTIFIED BY 'meipass';
ログアウト。
MariaDB [(none)]> exit
Bye
最新版
~]# wget https://github.com/roundcube/roundcubemail/releases/download/1.5.2/roundcubemail-1.5.2-complete.tar.gz
~]# tar zxvf roundcubemail-*.tar.gz
~]# mv roundcubemail-*/ /var/www/roundcubemail
~]# chmod o+w /var/www/roundcubemail/temp/
~]# chmod o+w /var/www/roundcubemail/logs/
~]# rm -f roundcubemail-*.tar.gz
不足分インストール
~]# dnf -y install php-intl
DB 設定
~]# mysql -u root -p
Enter password:
・・・・・
・・・・・
・・・・・
MariaDB [(none)]> CREATE DATABASE roundcubemail;
MariaDB [(none)]> GRANT ALL PRIVILEGES ON roundcubemail.* TO roundcube@localhost IDENTIFIED BY '任意のパスワード';
MariaDB [(none)]> exit
~]# mysql -u roundcube -p roundcubemail < /var/www/roundcubemail/SQL/mysql.initial.sql
Enter password:
RoundCube 設定
~]# vi /var/www/roundcubemail/config/defaults.inc.php
変更。
// TCP port used for IMAP connections
$config['default_port'] = 143;
↓↓↓
$config['default_port'] = 993;
// Enforce connections over https
// With this option enabled, all non-secure connections will be redirected.
// It can be also a port number, hostname or hostname:port if they are
// different than default HTTP_HOST:443
$config['force_https'] = false;
↓↓↓
$config['force_https'] = true;
// This domain will be used to form e-mail addresses of new users
// Specify an array with 'host' => 'domain' values to support multiple hosts
// Supported replacement variables:
// %h - user's IMAP hostname
// %n - http hostname ($_SERVER['SERVER_NAME'])
// %d - domain (http hostname without the first part)
// %z - IMAP domain (IMAP hostname without the first part)
// For example %n = mail.domain.tld, %t = domain.tld
$config['mail_domain'] = '';
↓↓↓
$config['mail_domain'] = 'example.tk';
// Use this charset as fallback for message decoding
$config['default_charset'] = 'ISO-8859-1';
↓↓↓
$config['default_charset'] = 'ISO-2022-JP';
// The way how contact names are displayed in the list.
// 0: prefix firstname middlename surname suffix (only if display name is not set)
// 1: firstname middlename surname
// 2: surname firstname middlename
// 3: surname, firstname middlename
$config['addressbook_name_listing'] = 0;
↓↓↓
$config['addressbook_name_listing'] = 2;
// Interface layout. Default: 'widescreen'.
// 'widescreen' - three columns
// 'desktop' - two columns, preview on bottom
// 'list' - two columns, no preview
$config['layout'] = 'widescreen';
↓↓↓
$config['layout'] = 'list';
// Set true if deleted messages should not be displayed
// This will make the application run slower
$config['skip_deleted'] = false;
↓↓↓
$config['skip_deleted'] = true;
// If true, after message/contact delete/move, the next message/contact will be displayed
$config['display_next'] = true;
↓↓↓
$config['display_next'] = false;
~]# echo Alias /roundcubemail /var/www/roundcubemail > /etc/httpd/conf.d/roundcubemail.conf
~]# systemctl reload httpd
Webブラウザで https://サーバ名/roundcubemail/installer/ へアクセスする。
「NEXT」ボタン押下
Logging & Debugging
「log_driver」で "syslog” を選択
※ログを /var/log/messages に出力するようにする
Database setup
「Database password」に roundcubemail データベースのパスワードを入力
IMAP Settings
「default_host」にメールサーバ名(ssl://mail.example.tk)を入力
「junk_mbox」に"Spam"と入力
SMTP Settings
「smtp_server」にメールサーバ名(tls://mail.example.tk)を入力
「Use the current IMAP username and password for SMTP authentication」をチェック
※SMTP認証にIMAPサーバのユーザ名/パスワードを使用する
Display settings & user prefs
「language」に "ja_JP" と入力
「CREATE CONFIG」ボタン押下
「Download」ボタン押下
ダウンロードした config.inc.php を /var/www/roundcubemail/config ディレクトリへアップロードする。
「CONTINUE」ボタン押下
不要となったインストーラを削除
~]# rm -rf /var/www/roundcubemail/installer/
https://サーバ名/roundcubemail/ にアクセス。
最新版
~]# wget https://www.luxsoft.eu/dloader.php?file=luxcal511M.zip -O luxcal511M.zip
~]# unzip luxcal511M.zip -d luxcal511M
~]# rm -f luxcal511M.zip
~]# cd luxcal511M
luxcal511M]# unzip luxcal511M-calendar.zip -d /var/www/luxcal
luxcal511M]# chmod o+w /var/www/luxcal/
luxcal511M]# chmod o+w /var/www/luxcal/files/
luxcal511M]# chmod o+w /var/www/luxcal/logs/
luxcal511M]# chmod o+w /var/www/luxcal/attachments/
DB 設定
~]# mysql -u root -p
Enter password:
・・・・・
・・・・・
・・・・・
MariaDB [(none)]> CREATE DATABASE luxcal;
MariaDB [(none)]> GRANT ALL PRIVILEGES ON luxcal.* TO luxcal@localhost IDENTIFIED BY '任意のパスワード';
MariaDB [(none)]> exit
Alias 設定
~]# echo Alias /luxcal /var/www/luxcal > /etc/httpd/conf.d/luxcal.conf
~]# systemctl reload httpd
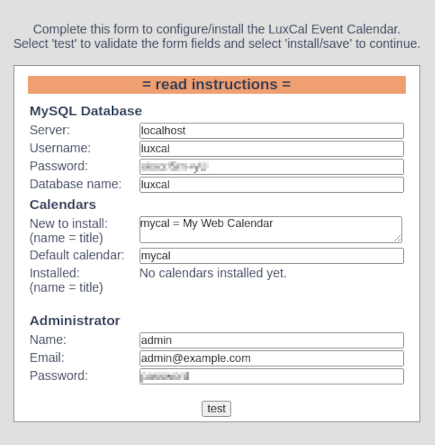
Webブラウザで https://サーバ名/luxcal/ へアクセスする。
フォームに入力。
MySQL Database
Server、Username、Password、Database name
「Server」はデータベースサーバの名前であり、たとえば「localhost」のようになります。
「Username」「Password」「Database name」は、サーバ上にデータベースを作成したときに使用された値です。
Administrator
Name、Email、Password
これらの値は、後でカレンダーにログインするために必要になるため、覚えておく必要があります。
「test」でフォームフィールドを検証し、「install/save」をクリック。
1) カレンダーのルートフォルダにある構成ファイル lcconfig.php をバックアップします。
2) カレンダーのルートフォルダからファイル installxxx.php と upgradexxx.php を削除します。
アクセスは、https://サーバ名/luxcal/ 。
カレンダーにログインし、管理メニュー(右上)に移動し、
- [Settings]ページで Timezone を「Asia/Tokyo」に設定するなど、好みの設定に変更する。
- [Users]ページで Public Access を「Read access」→「No access」に変更すれば、ログインしないと閲覧も出来なくなる。
使用言語などを変更した場合は、再ログインしないと反映されない。
- guitar site WAVE -